Image Splitter: How to Split an Image Into Multiple Parts
An **Image Splitter** provides a faster approach by dividing one source image into multiple independent pieces. Instead of manually creating each crop, you define the grid or cut positions first and generate all required sections from the same image. PicEditor's [Image Splitter](https://piceditor.ai/image/image-splitter/) supports both equal grid layouts and custom cut lines, making it useful for regular tiles as well as images with uneven sections.
What Is an Image Splitter?
An Image Splitter is an online image tool designed to divide one picture into multiple smaller images. Unlike a standard crop tool, which normally extracts one selected area at a time, an image splitter can define several sections and create multiple outputs from a single source.
For example, you can divide a square image into a 3×3 grid and create nine individual tiles. You can also add your own horizontal and vertical cut lines when the source image contains sections of different sizes.
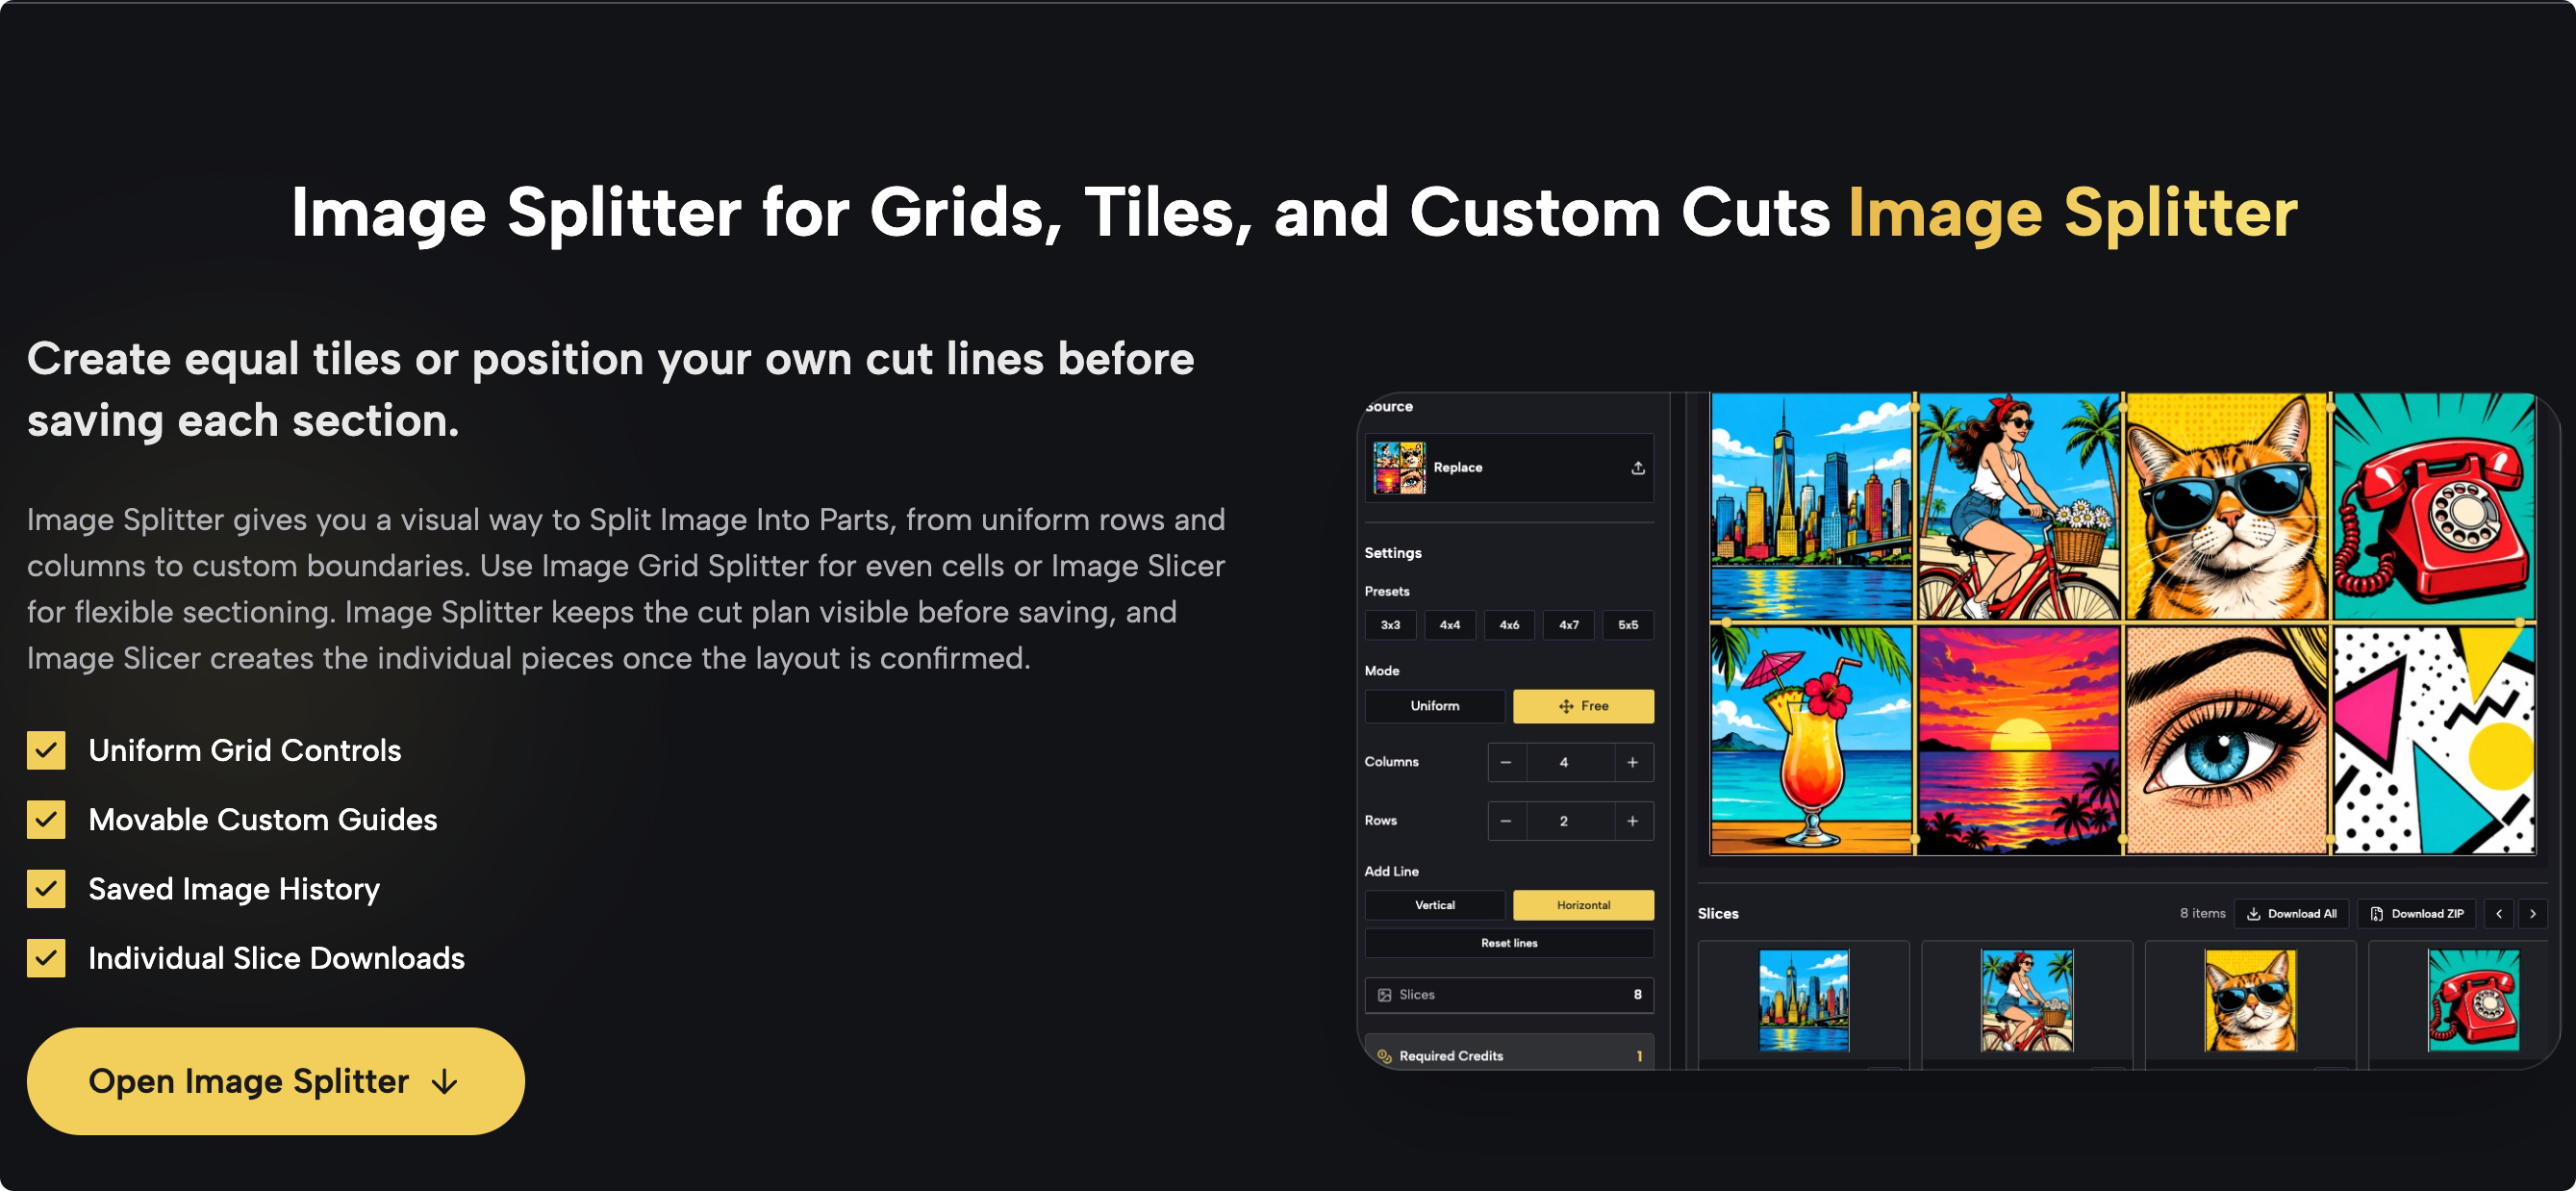
PicEditor provides two main approaches. Uniform mode divides an image into equal rows and columns, while Free mode lets you position cut lines manually according to the content of the image. The tool also supports PNG, JPG, and WebP uploads up to 10MB.
This flexibility makes image splitting useful for much more than social media grids. It can also help separate product images, comic panels, artwork, worksheets, reference collections, and other multi-section graphics.
Key Features of Image Splitter
A useful image splitter should give users control over both the number of sections and the exact position of each cut. PicEditor combines several functions for these different situations.
Equal Grid Splitting
Uniform mode lets you divide an image into rows and columns of equal size. Instead of calculating pixel dimensions manually, you can choose the structure and let the Image Grid Splitter create evenly spaced sections.
This works particularly well when every resulting image needs to have the same dimensions.
Preset Grid Layouts
Several common grid structures are available directly in the interface, including 3×3, 4×4, 4×6, 4×7, and 5×5. You can also adjust the number of rows and columns when the preset layouts do not match your project.
Custom Horizontal and Vertical Cuts
Not every image follows an equal grid. Free mode allows you to add vertical and horizontal guide lines and move them around the image.
This gives you greater control when separating content such as comic panels, products, scanned documents, or mixed-size visual blocks.
Visual Cut Preview
The guide lines remain visible before you perform the split. This makes it easier to check whether a cut passes through a face, title, product, or other important visual element.
You can therefore adjust the layout before creating the final files instead of discovering a bad crop after exporting.
Individual and Batch Downloads
Once the image has been divided, every section becomes a separate result. You can download an individual slice when you only need one section or use Download All or ZIP when you want the entire set.
How to Use Image Splitter
Splitting an image does not require complicated image-editing software. The complete process can be handled in three main steps.
Step 1: Upload Your Image
Open the Image Splitter and upload the image you want to divide.
The uploaded picture appears on the editing canvas, allowing you to see the source image and planned divisions before creating any separate files.
For the best results, use a reasonably high-resolution source image. Remember that splitting an image creates smaller sections from the existing pixels; it does not increase the original resolution.
Step 2: Choose Your Split Method
Next, decide whether the image should be divided evenly or according to its visual content.
Choose Uniform mode when all pieces should have equal dimensions. Select a preset grid or adjust the number of rows and columns manually.
Choose Free mode when the sections have different widths or heights. Add horizontal or vertical guide lines and drag them until each boundary matches the area you want to separate.
Before continuing, examine the guide lines carefully. Important text, faces, logos, or focal objects should not accidentally sit across two different slices unless that effect is intentional.
Step 3: Cut and Download
Once the layout is correct, select Cut & Save.
The Image Slicer processes the layout and generates separate files for each defined section. You can preview the resulting pieces, download individual images, download the complete collection, or save the set together as a ZIP file.
Popular Image Splitter Use Cases
Image splitting can support many workflows where one large composition needs to become several smaller assets.
Social Media Grid Posts
A large campaign design can be divided into matching tiles for social media. A 3×3 split, for example, converts one square composition into nine individual images.
Because the sections come from the same source image, the tiles can maintain the visual continuity of the original design.
Product Sheets and Catalog Images
Suppliers, sellers, and designers sometimes receive one image containing several products or samples.
Instead of manually cropping each item, you can use an Image Splitter to turn the sheet into separate product assets. Regular product matrices work well with Uniform mode, while irregular layouts can be handled with custom guides.
Comics and Multi-Panel Artwork
Comic pages and illustration boards often contain panels with different dimensions.
Free mode can place cut lines along the actual panel boundaries rather than forcing the artwork into an equal grid. This allows each panel to become a separate image while preserving its intended composition.
Reference Boards and Mood Boards
Mood boards, contact sheets, sprite-style collections, and reference sheets may contain dozens of useful elements inside one image.
Splitting the source first makes individual references easier to organize, send, upload, or reuse in other projects.
Educational Materials
Teachers and course creators can divide worksheets, visual exercises, flashcard sheets, puzzles, and learning graphics into smaller files.
Equal layouts are especially useful for matching cards or visual puzzles, while custom splitting works better when worksheet sections have different sizes.
Image Splitter FAQ
Can I split an image into equal parts?
Yes. Use Uniform mode and choose the required number of rows and columns. You can also select preset grids such as 3×3, 4×4, 4×6, 4×7, or 5×5.
Can I choose exactly where an image is cut?
Yes. Free mode lets you add and reposition horizontal and vertical guide lines, allowing different sections to have different dimensions.
What image formats can I upload?
PicEditor currently lists support for PNG, JPG, and WebP files with a maximum upload size of 10MB.
Does every section become a separate image?
Yes. After you confirm the layout and process the split, each section becomes an individual result that can be previewed or downloaded separately.
Can I download all split images at once?
Yes. In addition to individual downloads, the tool provides options to download the complete set together, including a ZIP workflow.
Should I use Uniform mode or Free mode?
Use Uniform mode when every piece should have matching dimensions. Use Free mode when objects or visual sections determine where the boundaries should be placed.
Conclusion
An Image Splitter turns repetitive manual cropping into a more controlled workflow. Instead of opening the same source repeatedly and exporting one crop at a time, you can define the entire split layout first and create multiple images in one process.
For symmetrical layouts such as social media tiles, puzzles, or organized product sheets, an equal grid keeps every section consistent. For comics, reference boards, mixed product sheets, and other irregular compositions, custom horizontal and vertical guides provide greater control.
PicEditor's Image Splitter combines both approaches, allowing you to create equal grids or custom slices, preview the planned cuts, and save the resulting images individually or as a complete collection. Whether you need nine social tiles or several irregular visual sections, the right split method can turn one large image into a more reusable set of assets.